Wednesday, 9 September 2015

Plum Puff Pastry Tart


My friend always brings my cake to visit one of her friend. She likes to eat sweet things. She plants a plum tree in her garden. And she knows I like cooking and baking. So, she asks my friend to pick up some plums and use it to bake. I never use plum to bake. HAHA… So, is it my challenge?

I still leave some puff pastry in the freezer. Why not just use it to bake some 30 minutes puff pastry tart. Simple and easy. Puff pastry is very good for every kind of food. Do this first. After I study more on how to use plum to bake a dessert, then I will share it to everyone.


Oven Temperature Setting: 200C/390F, Baking Time: 18~20 minutes
Recipe: 6 ea


Steps

(1) Core all the plums and cut it into chunks. Put them and sugar into the pan. Boil it and then keep cooking it with medium heat. Around 5 minutes
(2) Pour through a sieve. Set aside.

(3) Get 6 pieces puff pastry. Roll it into an oval shape. Place them on the greased baking tray. Prick the dough all over with a fork
(4) Place few pieces of plum on the pastry
(5) Brush the whipped egg at the edge. Send them into the pre-heat oven at 200C/390F around 18~20 minutes until the edge turns into golden.

Tuesday, 8 September 2015

Puff Pastry Bread


Again, puff pastry is very useful to bake either for main course or dessert. In Taiwan, we use puff pastry with bread. I think it is quite a new thing for other countries. I have traveled to US and some western countries lots of time. But, I never saw this kind of bread there. Even though I lived in the UK over a year, I didn’t find out this kind of bread in the UK. Of course, I should write it to my blog and show people another new way to use puff pastry.

I like to eat in warm. Because the pastry is so crispy and the bread is so soft. A very different taste of bread. Try this one if you are looking some new things. Enjoy it.


Oven Temperature Setting: 200C/390F; Baking Time: 15~20 minutes
Recipe: 8 ea


Steps of Bread:

(1) Weight all ingredients well before starting our brilliant work
(2) Place Strong Flour, Plain Flour, Granulated Sugar and Salt into a big bowl. And then, stir a while.
(Selena’s Kitchen Talk: Every time I bake the bread, I will mix dry ingredients firstly. Salt will kill yeast if it touches to yeast directly )
(3) Add yeast into the mixture. Mix it.

(4) Then, add Hot Batter and 100ml milk into the bowl as well. Stir and mix into well until there is no flour.
(5) Move the dough ball into a lightly floured work space. And put butter on the dough. Then, start to knead it. 
(6) Add 30ml milk several times when you knead the dough into a smooth and elastic dough ball.
(Selena’s Kitchen Talk: Adding milk into dough several times can make sure that the dough totally absorb the milk. I tried to add once at the beginning when I started to bake. It was okay, but the dough ball was very dried. )

(7) When the dough ball has a smooth surface, adding dried blueberry fruit into the dough. Knead it again. Then, moving it back to the lightly greased bowl. And brush some watch or milk on the surface of the dough ball. Wait around 1~2 hours until it doubles the size.


Steps of Assembly
(1) Squeeze the air out of the dough. Divide it into 8 pcs.
(2) Roll all 8 dough into 8 balls. Place it on the greased baking tray. Brush water on the balls.

(3) Get 8 pcs puff pastry. Cover puff pastry on the dough ball. Brush water on the top of pastry. Wait around 40 minutes to double the size again.
(4) When the dough doubles the size, brush whipped egg on the pastry. Send it into a 200C/390F pre-heated oven for around 15~20 minute. It is ready when the surface turns golden.

Puff Pastry


Puff Pastry is a very common and useful thing for cooking and baking. With it, there will be lots of new things for your food every day. You can use it on soups, starters, main courses, breads, or desserts. So, there are lots of food manufacturer sold frozen puff pastry at shops in the UK. I heard from my friend. It is same in the European countries. BUT… In Taiwan, baking is not so popular. The oven is the must-be thing in the kitchen. So, learning how to do puff pastry is very important. For me, I like to do more and freeze some puff pastry in the freezer. Then, I can unfreeze in the fridge one day before using it.


Recipe: around 600g
(Selena’s Kitchen Talk: There is no need to put butter at room temperature.)


Steps:
(1) Weight all ingredients
(2) Place flour, sugar and salt in a big bowl. Mix it
(3) Add the water into the bowl. Mix it well into a dough ball


(4) Place 25g butter on the top of dough. Well-incorporated the butter and dough into a ball. Cover it with a lid or cling film. Put it in the fridge and wait for 30 minutes.


(5) Place the dough on a table covered with flour
(6) Roll the dough into a big flat, around 30cm by 40cm. Place 200g butter in the middle of the place.
(Selena’s Kitchen Talk: Leave around 2 cm at the top and bottom of the edge. Then, butter will not be split at rolling later.)


(7) Fold one third into the middle. And then, fold another one third on top. Then, it will turn into a long strip. Roll the dough up and down gently.


(8) Fold one third into the middle from the top. And the fold another one third into the middle from the bottom. Then, wrap with a kitchen film. Put in the freezer. Wait for 30 minutes.
(Selena’s Kitchen Talk: It will be easier to handle the dough.)
(9) Roll into a large plate. Then repeat (7) and (8) at least 3 more time.


Saturday, 5 September 2015

Stuffed Potato – Bacon Flavor


Potato is always seen as the staple food in the UK, even though there are other choices. ME!! I have paradoxical feelings for potato. I love to eat it when it is cooked to be very crispy. When it is mashed, I might say NO to it. So, I love to eat chips (A LOT), but no jacket potato. But, I am in the UK. I should learn more ways to cook potato instead of only 2 ways I know.

Stuffed potato is another way to cook it. It is like a combination of baked potato and mashed potato. Okay… Let’s go and challenge it.


Recipe


Step

(1) Chop bacon, onion and mushrooms into small pieces, around 0.5cm by 0.5cm
(2) Prepared a fried pan. Heat the oil in the pan. Then, place onion and mushrooms into the pan. Cook it for at medium heat around 3~5 minutes.
(3) Add bacon into the pan. Cook it with onion and mushrooms another 3~5 minutes until it is well-cooked. Season it with 1/2 tea spoon salt. Then, switch off the heat. Set aside


(4) Peel the potatoes. Half the potatoes. Place these potatoes into a pan. Add boiling water in. Add 2 tea spoon salt. Boiling it for 5 minutes.
(5) Take them out of the pan. Cool it down with the running water around 1 minute to be handled.
(6) Spoon the flesh out. Leave around 0.5 cm shell. Place the shell on the baking plate covered with baking paper. Drizzle the shell with 1/4 tea spoon salt. Send them into the pre-heated oven at 200C/390F for 10 minutes. Than, move the flesh back to the boiling water. Keep boiling another 10 minutes.


(7)Then, turn over these potatoes. Add 1/2 tea spoon butter on top of potato. Send them bake to the oven at 200C/390F for 10 minutes.
(8) Place the removed flesh into a big bowl. Add 1 tea spoon butter and 2 tea spoon milk into the bowl. Mash potatoes.
(9) Put bacon mixture into the bowl. Mix them with mashed potato
(Selena’s Kitchen Talk: There are some juices in the pan. Don’t add these juices into the bowl.)


(10) Take potatoes out from the oven. It should turn the golden on the surface.
(11) Turn over these potatoes. Place bacon fillings on the top of each potato.
(12) Drizzle grated cheese over the top. Send it into the oven for another 3~5 minutes until the grated cheese is melted.


Again, I don’t like to eat mashed potato. This kind of cooking doesn’t have the texture of mashed potato in the mouth. It is more like the creamy texture in your mouth. The shell… It is good. It is crispy. I love it. It is a good way to cook potato if you are looking for a new way to eat potato. Try and enjoy it for this weekend. Enjoy it.

Scotch Egg


I have seen Scotch egg sold at shops around a year, but I never purchase it. Maybe, I don’t like to eat ready-to-cook meal. Or, I am not sure what this is so… I don’t want to try. Starting to write this Blog, I should try the new thing. I need to share different foods coming from different countries. This is my aim of this Blog.

I though Scotch egg originated from Scotland. But, searching on the Wiki, it was not. It originated in England. Some people even said it came from North Africa. What is the real story? Nobody knows. Anyway, my friend came and visit, she likes to eat egg a lot. When I was her flat-mate, I could see her to cook egg frequently. Why not did this for her?


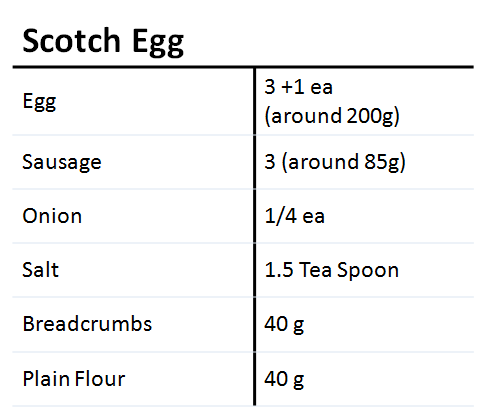
Recipe: Serve 3


Steps

(1) Place 3 eggs with their shells in the boiling water. The boiling water should reach to half the height of the eggs. Add 1/2 tea spoon salt into the pan. Cover the lid. Cook for 6 minutes.
(Selena’s Kitchen Talk: I like to eat runny yolk. This “steam way” and “6 minutes” are perfect for the runny yolk. If you do not like it, the amount of water should cover over the egg. And cook it around 10~12 minutes.)
(2) Then, cool the egg under the running water. Then, peel it. Drizzle the rest of 1/2 tea spoon salt on the eggs.

(3) Chop the onion into small pieces, around 0.5 cm by 0.5 cm. Peel off the skin of the sausage.
(4) Mix onion, sausages and 1/2 tea spoon salt well. Divide the sausage mixture into 3. Place each on the cling film. Flatten it into a thin surface. Cover the egg with sausage mixture completely.

(5) Place plain flour, whipped egg, and breadcrumbs into different dishes. Roll to coat plain flour firstly. Then roll to coat whipped egg. And then, roll to coat breadcrumbs. Make sure each coating needs to cover the whole sausage mixture complete.

(6) Heat up the oil in the fried pan. When the oil is heated, switching to the small heat. Then, place CAREFULLY each Scotch egg into the hot oil. It needs to fry around 8-10 minutes until the coated crumbs become golden and crisp. And the sausage meat is well-cooked.
(7) Place the cooked Scotch egg on the sieve


I was surprised about this Scotch egg. It is very delicious. There are very different taste for both the sausage and the egg than we usually have. A crispy and golden sausage wraps soft egg. Having every bite, you can taste the meat juices in your mouth. Serve with potato and vegetable. It is a very good choice for the lunch in the weekend. Enjoy it.

Thursday, 3 September 2015

Blackberry Cheese Cake with Shortbread Crust


After baking two different blackberry sponge cake. I need find out a new texture for my blackberry cake season. My favorite cake is classic cheesecake. I like the enriched and silky cream cheese filling in the mouth. The dense of cheese cake is the reason people like it. It is so simple to bake even though I am a new baker. So, cheesecake with blackberry, um… it sounds brilliant. And don’t use digestive biscuits today. It is so boring to use it all the time. Try a new crust for my blackberry cheese cake.
I think baking can reflect a person’s personality. I like to add something new in the classic style. I admit I am an old-school person, but I like to have some different things for my old-school life.


Oven Temperature Setting for shortbread crust: 200C/390F for 10 minutes
Oven Temperature Setting for cheese cake : 200C/390F for first 10 minutes; 170C/325F for another 30~35 minutes
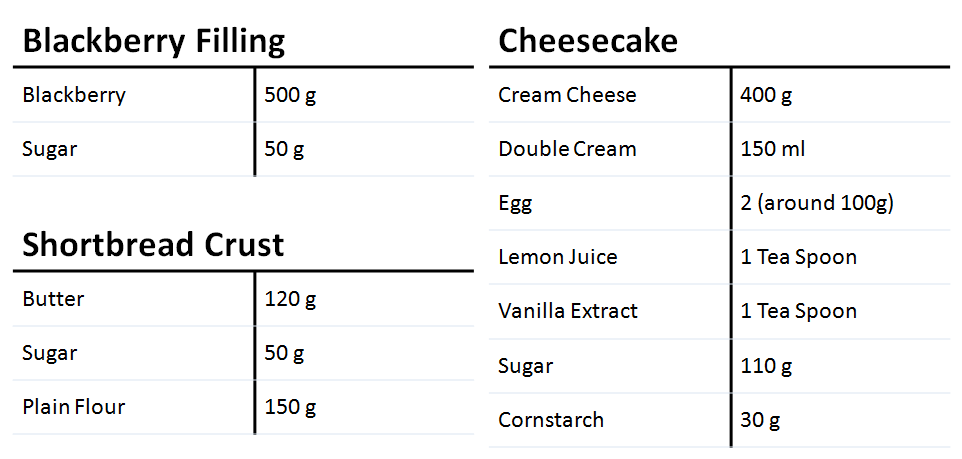
Recipe: For a 8” round baking tray


Steps of Blackberry

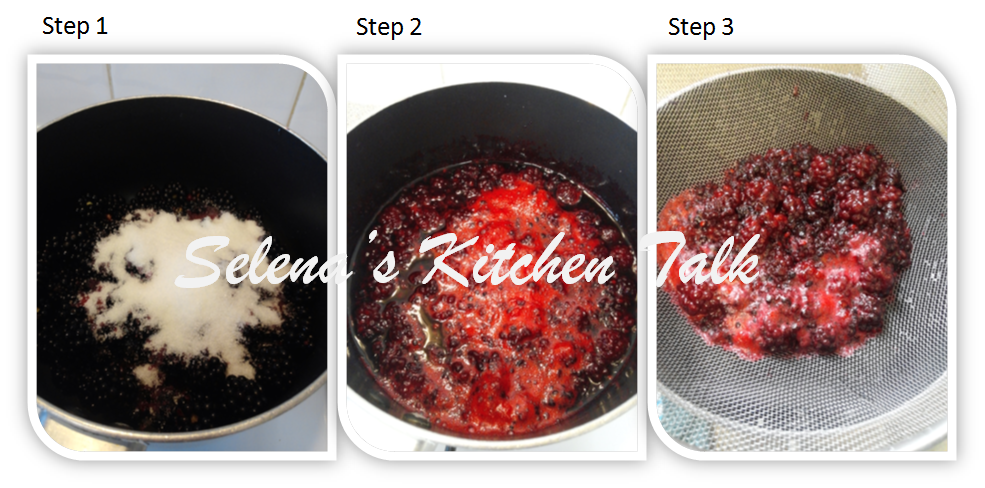
(1) Put blackberry in the pan. And add sugar in it.
(2) Boiling blackberry for around 5 minutes
(Selena’s Kitchen Talk: We can use a folk mashing a couple of blackberries first. It is easier to cook it. )
(3) Pour through a sieve. Set aside.


Steps of Shortbread Crust

(1) Weight all ingredients
(2) Add butter and sugar into a bowl. Mix it well until it looks fluffy and lightly.


(3) Add flour into the butter batter. Mix it well
(4) Pout it into a 8” tin. Spread and press it evenly by our fingers or a spoon. Leave it in the fridge around 10 minutes. And then, send it to a pre-heated oven at 200C/390F for around 10 minute until the top become golden.


Steps of Cheese Cake

(1) Weight all ingredients
(2) Put all wet ingredients (cream cheese, egg, cream, vanilla extract, and lemon juice) into a bowl. Well-mixed all ingredients into a light yellow batter.


(3) Add sugar and cornstarch into the batter. Mix well again.
(4) Add blackberry filling gradually (3~4 times) into the batter. Use a baking spatula fold the batter gently.


Steps of Assembly

(1) Remove shortbread from the oven. Use a spoon to press it tightly again.
(2) Pour the blackberry batter over the shortbread crust. Send it back to the oven. Bake at 200C/390F for 10 minute. And then, turn the temperature to 170C/325F for another 30~35 minutes.
(Selena’s Kitchen Talk: Insert the cake tester into the middle of the cake. If there is no batter left on it, it means it is ready.)


For cheesecake, I’ll leave it into the oven with an open door around 20 minutes. (Of course, the oven is switched off!) It can prevent the sink because the temperature difference.


The best taste of cheese cake is to leave in the fridge over 8 hours and EAT it. So, be patient. My friends and I ate this last night. Oh~~ It is so YUM. We were all full, but we still wanted more cheese cake. The sweet-sour flavor of blackberry balances the creamy cheese cake. It is so perfect with shortbread crust. Just one bite, you can have dense cheese cake, sweet-sour blackberry, and crispy shortbread. Look for something to bake for this weekend, try this one. Enjoy it.

Wednesday, 2 September 2015

Ciabatta


Having a picnic and enjoying the bright sunshine in the summer are very popular in the UK. There is only a very short time to have a warm sunshine. Of course, sandwich is a popular food for the picnic. And then, sandwich is the reason why Ciabatta was created by Italian baker. At that time, the French Baguette was very popular to make the sandwiches. The Italian bake was looking for an alternative to make sandwiches. So… we have Ciabatta now. It is higher water content dough so that it is really hard to bake it. Let’s go and challenge it.


Oven Temperature Setting: 240C/465F, Baking Time: around 20~25 minutes
Recipe: Serve for 6 ea (Reference Paul Hollywood)


Steps of Overnight Preparation
 
(1) Weight all the ingredients
(2) Mix flour and yeast in a bowl
(Selena’s Kitchen Talk: Different instant yeast manufacturers have different instructions. Please check it.)


(3) Add water in the flour mixture. Stir it into until well-incorporated.
(4) After well-mixed. Cover the lid and put in the fridge. Stay at least 8 hours.
(Selena’s Kitchen Talk: This kind of overnight preparation is similar to an technique used in Taiwan. It is okay to leave there around 1 day.)


Steps of Main Dough

(1) Weight all the ingredients
(2) Add the flour and yeast into the overnight preparation dough and mix it well.
(Selena’s Kitchen Talk: Different instant yeast manufacturers have different instructions. Please check it.)


(3) Gradually add 150 ml water into the dough and mix it.
(Selena’s Kitchen Talk: If the yeast needs to add into the water, the step (3) will become to “Add yeast into 150ml water and wait around 5 minutes. Gradually add into the dough and mix it.”)
(4) Add salt into the remaining 40 ml water. And then pour into the dough and mix it.


(5) Grease olive oil on the baking tray. Fold the dough onto the baking tray. Gently shape the dough into the long and flat rectangular.
(Selena’s Kitchen Talk: DO NOT KNEAD IT. Shaping the dough into the rectangular can make us easier to divide and shape it later. )
(6) Put in a warm place. Wait around 1 hour to let the dough double in size.
(7) Divide it into 6. Move the 6 piece into a heavily flour surface.  Drizzle some flour over the top. Wait another 30 minutes. Then, send it into a pre-heated oven at 240C/465F.
(Selena’s Kitchen Talk: If you like to have more golden and crispy crust, putting an empty tray in the oven when you pre-heat the oven. Add the boiling water into the tray just before you send the bread into the oven.)


It is really a good Ciabatta recipe. My friends and I had a lovely light dinner, a Ciabatta Ham Sandwich last night. It is so YUM. If you are planning your picnic this weekend, try to use Ciabatta this time. Have a crispy crust and soft light inside. It can be very good even you just want to enjoy Ciabatta only. Enjoy it!