Showing posts with label breakfast. Show all posts

Wednesday, 6 January 2016

Bacon and Goat Cheese Bread Roll


What is the most hot topic around? Recently, people keep talking about how much they ate during X’Mas when I went to work out in the gym or went swimming in the pool. Yes, I believe everyone enjoyed lots of feasts with your families and friends. So do I. It is very important to have exercise after those delicious food. What are you going to do today after work off? Pick up your walking shoes and just walk to the park. Be healthy and enjoy more delicious food.

Oven Temperature Setting: 200C/400F/Gas Mark 6
Baking Time: 20~30 minutes
Recipe: Serve 3~5 people


Steps of Bacon and Goat Cheese Bread Roll

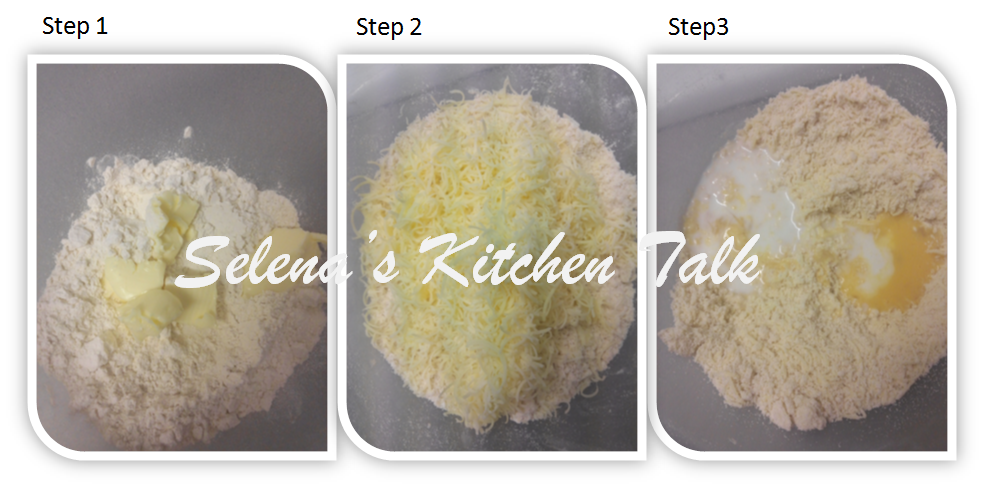
(1) Add flour, and salt in the bowl. Mix all ingredients well
(2) Add egg, milk with instant yeast and butter into the bowl. Knead it into the chunk
(Selena’s Kitchen Talk: I reserve 1 table spoon of egg for brushing on the surface of bread.)


(3) Move the dough into the floured table. Knead the dough until it turns softer and more elastic.
(4) Shape the dough into a ball and put back to the bowl. Leave the dough in a warm place to double its size. It takes around 90 ~ 120 minutes


(5) At this moment, prepare a pan. Fry bacon and set aside for later use.


(6) After the first grow-up, move the dough to the working table with light flour. Roll it into around 35X25cm rectangle.


(7) Place bacon on the top of bread. Then, add chopped goat cheese and basil leaves on the top of bacon.


(8) Roll it up. Slice in the middle of the bread. But, leave one end. Roll it again to shape the bread into a bow.


(9) Leave in the warm place to grow up again. It takes around 40~60 minutes. Brush some egg over the top. Then, send it to the pre-heated oven at 200C/400F/Gas Mark 6 for 20~30 minutes until it turns golden on the top.


It is a very tasty bread roll which can be eaten as the breakfast, light lunch, or your tea time. Try it and let me know your feeling.

Tuesday, 15 December 2015

Cheese Scone


X’Mas is closer and closer. Have you put every X’Mas decoration? Do you get your X’Mas jumper? Or, do you start to listen X’Mas songs? When our lives become digitalized, those X’Mas decorations are digitalized as well. When I walked passed our neighbor couple days ago, I saw some scary things. I think, “Oh My God, don’t tell me I see the ghost.” Then I found out I was wrong. It is a light show. There are Santa, snowflake, firework… Those project lights are not always there so you will see some shadow. Technology!! It does make our life easy and make our life scary. Haha

Oven Temperature Setting: 200C/400F/ Gas Mark 6
Baking Time: 12~15 minutes
Recipe: 8 Cheese Scone


Steps of Cheese Scone
(1) Add flour, baking powder and salt in a big bowl. Mix a little bit. Then, use your finger tips to rub butter into flour. It will turn into breadcrumbs like
(2) Add 80 g grazed cheese into the mixture. Mix cheese into the crumbs like flour until it distributed evenly.
(3) Add milk and egg into the bowl. Use a knife to mix everything well. Do not over mix it. It should be soft, but a firm dough.
(Selena’s Kitchen Talk: I leave one table spoon of egg for the brushing.)


(4) Then, turn the dough into a floured table. Roll it into a round shape with 1.5 cm height. Cut into quarters firstly, then half each quarter diagonally.


(5) Place cut scone on a greased plate. Brush some egg over the top. Drizzle the left cheese over the top. Send them into a pre-heat oven at 200C/400F/Gas Mark 6 for around 12~15 minutes until it turns golden over the top.


Scone is very easy to make it. It is my lazy baking. I mean I want to eat some dessert, but I am lazy to do some complicated one. Then, making scone could be my choice for my lazy. So, after hard work on house decoration, why not have a scone with a cup of tea or coffee. Enjoy it.

Sunday, 15 November 2015

Yogurt Bread


At my house, my friend and I are both bread lovers. We eat bread every single day. We might not only eat it in breakfast, but also in lunch or tea time. So, bread is very quickly to be consumed at our house. Occasionally, we are very lazy to bake breads from the scratch so that we will use “bread mix.” It is easy to knead, and it takes less than an hour. And then, you can have fresh bread to eat.

But, mostly, we still bake fresh bread from the beginning. Mix flour, sugar, salt, and knead until it becomes soft and elastic. If you don’t have dough mixer, like me, you might need around 20~30 minutes to knead the dough. I just see it as a work out.

Oven Temperature Setting: 200C/400F/Gas Mark 6
Baking Time: Around 12~15 minutes
Recipe: 9 Yogurt Bread


Steps of Yogurt Bread

(1) Add flour, salt and sugar into a big bowl. Mix a little.
(2) Add milk with instant yeast and yogurt into the bowl. Mix all ingredients well.
(Selena’s Kitchen Talk: My instant yeast’s instruction is to add yeast in the water around 5 minutes. Check the instruction before using it.)
(3) Then, move the dough into a floured table. Knead olive oil into the dough. Knead the dough until it turns soft and elastic.


(4) Add raisin into the dough. Knead around 2 minutes until it distributes evenly. Shape the dough into a ball and put back to the bowl. Leave the dough in a warm place to double its size. It takes around 90 ~ 120 minutes


(5) After the first grow-up, move the dough to the working table with light flour. Separate it to 9 small balls equally. Leave the dough in a warm place to double its size again. It takes around 40 ~ 60 minutes


(6) Brush some egg or water over the top of dough. Send it to the pre-heat oven at 200C/400F/Gas Mark 6 and bake around 15~20 minutes until the top turns golden.

 
Because of yogurt, the taste of yogurt is softer. Every bite has a very lighter flavor of yogurt. It is a good idea to mix yogurt into the bread. It sounds more health. Enjoy it.

Monday, 9 November 2015

Pumpkin Bread


It has been a week after Halloween. Time flies, doesn’t it? Actually, all shops started to display their X’mas things on the day after Halloween. OH MY GOD…  X’mas is coming… AGAIN!! I need to start to prepare some X’Mas gifts for my friends. And, this will be the second X’Mas I will have in the UK.

After Halloween, we still left some pumpkin. But, it was too much pumpkin to eat after you ate pumpkin for all week. So, I left that little piece in the fridge. I don’t want to do any sweet thing with pumpkin so that I thought… Why not do a pumpkin bread as my breakfast?!

Oven Temperature Setting: 200C/400F/Gas Mark 6
Baking Time: 15~20 minutes
Recipe


Steps of Pumpkin Bread

(1) Add flour, salt and sugar into a big bowl. Mix a little.
(2) Add 130 ml milk with instant yeast, pumpkin puree, and egg into the bowl. Mix all ingredients well.
(*Selena’s Kitchen Talk: I leave ONE table spoon of egg for brushing.
**Selena’s Kitchen Talk: My instant yeast’s instruction is to add yeast in the water around 5 minutes. Check the instruction before using it.)


(3) Then, move the dough into a floured table. Fold olive oil into the dough.
(Selena’s Kitchen Talk: Because this dough is very wet and sticky, it is really hard to handle it. I fold it a little bit only.)

(4) Trying to shape the bread as a big rectangle on the greased baking tray. Let it grow around 3 hours at room temperature slowly.
(5) Brush some egg or water over the top
(6) Send it to the pre-heat oven at 200C/400F/Gas Mark 6 and bake around 15~20 minutes until the top turns golden and crispy.


LOOK… How beautiful air holes in my pumpkin bread. I didn’t knead the dough that it is too wet and sticky to manage it. Instead, I folded it after mix all ingredients well. I prolong the time of proving and skip the second grow-up process that makes bread very soft.
I love my pumpkin bread a lot. Try a different bread for your breakfast or tea time. Enjoy it.

Monday, 2 November 2015

Crossiant


Lots of people have very complicated feeling about crossiant. People love crossiant because of the crispy, but we are afraid of knowing how much butter bakeries use. Although not everyone has this king of feeling, but most of us have. When I told to my friend I’m doing Crossiant, my friend said I’m not coming to kitchen now. Because I don’t want to know how much butter you use in. Hee… Not a lot!!

Someone said I’m crazy to bake crossiant by myself because you can buy 4 for a pound!! I know it, but I just like to do it. So, enjoy your Crossiant


Oven Temperature Settig: 200C/400F/Gas Mark 6
Baking Time: 15~20 minutes
Recipe: 12


Steps of Crossiant

(1) Add flour, salt and sugar into a big bowl. Mix a little.
(2) Add 200 ml milk with instant yeast into the bowl. Knead it into the chunk
(Selena’s Kitchen Talk: My instant yeast’s instruction is to add yeast in the water around 5 minutes. Check the instruction before using it.)


(3) Then, move dough to a floured table and knead the dough until it turns soft and elastic.
(4) Shape the dough into a ball and put back to the bowl. Leave the dough in a warm place to double its size. It takes around 90 ~ 120 minutes


(5) After the first grow-up, move the dough to floured table. Roll it into a big flat, around 30X50 cm.


(6) Place 200g butter in the middle of the place. Fold one third into the middle. And then, fold another one third on top. Then, it will turn into a long strip.
(Selena’s Kitchen Talk: Leave around 2 cm at the top and bottom of the edge. Then, butter will not be split at rolling later.)


(7) Fold one third into the middle from the top. And the fold another one third into the middle from the bottom. Then, wrap with a kitchen film. Put in the freezer. Wait for 30 minutes.
(Selena’s Kitchen Talk: It will be easier to handle the dough.)
(8) Then, roll it into a 30X 50 cm rectangle. Repeat (6) and (7) at least 3 more time.


(9) Roll it into a 30X50cm rectangle. Cut the dough into 12 triangles like the picture.


(10) Roll into the crossiant from the base of triangle
(11) Leave in the cold place to grow up. It takes around 90~120 minutes.
(12) Brush some egg and then send it into the pre-heat oven at 200C/400F/Gas Mark 6. Bake it around 15 minutes until the top turns golden and crispy.


Fresh Crossiant is also so yum. Crispy top and soft inside. Who can say NO to this delicious bread?! Just enjoy it!

Sunday, 18 October 2015

Bagel

 
I have a long long story for the bagel. It was not so popular back 10 years ago in Taiwan. Only few shop sold bagel. My classmate at college had a part-time job at Costco so that I always needed to ask his help to buy it for me. But, I felt sorry to bother him a lot. Probably, I just ate it once per quarter.

Later, when I started to work, Costco set up a new branch in that city. I had more chances to eat it. Or, I should say I always went there every two weeks to purchase some bagels! It is weird, isn’t it? People can obsess on one thing without any reasons. Plus, Bagel can be eaten as breakfast, brunch, lunch, or light tea time. It is a very good choice, isn’t it?!

Oven Temperature Setting: 200C/400F/Gas Mark 6
Baking Time: Around 15 minutes
Recipe: 6 Bagels

 
Steps of Bagel

(1) Add flour, salt and sugar into a big bowl. Mix a little.
(2) Add 200 ml milk with instant yeast into the bowl. Knead it into the chunk
(Selena’s Kitchen Talk: My instant yeast’s instruction is to add yeast in the liquid around 5 minutes. Check the instruction before using it.)
(3) Then, knead olive oil into the dough.

 
(4) Knead the rest of milk into the dough gradually until it turns softer and more elastic.
(5) Shape the dough into a ball and put back to the bowl. Leave the dough in a warm place to double its size. It takes around 90 ~ 120 minutes

 
(6) After the first grow-up, move the dough to the working table with light flour. Separate it to 6 small balls equally.

 
(7) Roll one small ball into a long stick. Fold in one side and press it into a flat dough. And lightly moisten both ends with water. Using the flat end wraps another end and press to join. Slightly widen the hole in the middle. Repeat this step for the rest of 5 dough. Set aside at a warm place and wait for bagels double the size again. It takes around 40 ~ 60 minutes.
 

(8) Prepare a deep saucepan. Boil the water and add 50 g sugar in. Then, boil 3 bagels at once. It takes 30 seconds at one side. Then, turn over and boil another side 30 seconds. Then, place them on the baking tray. Repeat this step for the rest of bagels.
(9) Brush some whisked egg over the top of bagels. Send the bagels into the pre-heat oven at 200C/400F/Gas Mark 6. It takes around 15 minutes until it turns golden on the top.

 
The reason I like to eat bagel is because of its texture. It has a very chewy crust. So, how will you eat your bagel? Eat straight away, or as a brunch?!