Monday, 31 August 2015

Upside-Down Blackberry Cake


It is blackberry season in the UK. There are a lot of blackberries over there. My classmates and I walked by some last Saturday that they were surprised about it. They said they were curious about it and not sure these are blackberry. One girl picked up some. I think she likes it. Why is my new blackberry cake? Upside-Down Blackberry Cake. I never bake this one, but the principle of upside-down cake is same. Let me show you how to do it.


Oven Temperature Setting: 160 / 320. Baking Time: around 30 minutes
Recipe: For a 8” baking tin


Steps of Blackberry Topping

(1) Weight all ingredients
(2) Switch on small heat. Add butter into the pan and melt it. Add 45g sugar into the melted butter. Whisk it well. It is no need to melt sugar.
(3) Add Blackberry in the pan. Switch to medium heat. Mix blackberry and butter-sugar.
(Selena’s Kitchen Talk: Use a fork to squeeze few blackberries. It is easier to cook.)

(4) After boiling around 3~5 minutes, add the rest of sugar in the pan. Keep boil around 10 minutes.
(5) Pour the blackberry in the baking tin with baking paper. Set Aside.

 
Steps of Cake

(1) Weight all ingredients
(2) Add milk and egg in a bowl. Whisk them.
(3) Add butter into the batter. Mix it well

(4) Add flour, sugar, baking powder into the batter. Make sure they are mixed well.
(5) Pour the cake batter over the top of blackberry.
(6) Send it to a pre-heated 160 / 320 oven.


When it is well-cooked, I’ll leave it into the oven with an open door around 10 minutes. (Of course, the oven is switched off!) It can prevent the sink because the temperature difference. Then, wait around another 20~30 minutes to wait the caramel blackberry be set. Then, put a plate over the cake. Flip the cake over, CAREFULLY.

Compared to my previous Blackberry Cake, this upside-down blackberry cake has a different taste. When you eat upside-down blackberry cake, the taste of blackberry is stronger than Blackberry Cake. Because the upside-down blackberry cake layers the topping and the cake separately. Blackberry Cake is mixed blackberry filling with cake so that you feel blackberry flavor instead of eating blackberries. So, enjoy it. And see which one you like more.

Sunday, 30 August 2015

Fried Bāozǐ – Bacon Flavor


 Most foreign people know about what dumping is. But, fried bāozǐ, bigger version, are not so well-known. Actually, it is also popular in Taiwan. The dough of fried bāozǐ is different like dumpling’s one. Fried bāozǐ’s dough adds yeast to grow up the dough. Dumpling’s one doesn’t need it. So, the taste is different. I like fried bāozǐ more than dumpling. I like the softer bun and filling chewed in the mouth.

When doing this people in Taiwan, people use pork mince. But, I like to do something differently. I use smoky bacon and reduced seasoning to the less. Some seasoning is not so easily to purchase in the UK. Why not just use the basic one?


Recipe: 18 ea

 
Steps of Dough

(1) Weight all ingredients
(2) Add flour, sugar and salt into the bowl. Mix well
(3) Add yeast into the bowl. Mix it well
(Selena’s Kitchen Talk: Different instant yeast manufacturers have different instructions. Please check it.)

(4) Add water into the bowl. Knead into a chunk.
(5) Drizzle oil on the top of the dough. Knead it around 2~5 minutes until it is not sticky.
(Selena’s Kitchen Talk: Yes, this kind of dough doesn’t need to knead like breads.)
(6) Brush water on the top of the dough. Set aside and wait until the dough has doubled in size. Around 60~90 minutes.


Steps of filling

(1) Soak Chinese mushrooms in the water around 30 ~ 40 minutes.
(2) Chop sweet cabbage and onion into small pieces, less than 1 cm by 1 cm. The size doesn’t need to be exactly the same size.

(3) Add 1 tea spoon salt into the chopped sweet cabbage and onion. Wait around 30 minutes. And then, wash out the salt, and dry it
(Selena’s Kitchen Talk: They are water-content of vegetables. Doing it can dehydrate them. And make it easier to wrap in the dough.)
(4) Chop Chinese mushroom and bacon into small pieces, less than 1 cm by 1 cm. Mix it with sweet cabbage and onion. Add 3 tea spoon salt and 1/2 white pepper in. Mix it well.

Steps of Assembly

(1) Knead the air out the dough. Divide it into 18 small balls. Each ball is around 30~35 g
(2) Roll a ball into a round shape, around 15 cm diameter. Hold it on your hand

(3) Put 2 table spoons of filling in the middle of the dough. And then wrap it. Please reference https://www.youtube.com/watch?v=sCoMPULp5LM  for more detail instructions.
(4) Repeat step (2) and (3) until using out all dough balls
(Selena’s Kitchen Talk: If there is any filling left, don’t throw away. You can do the fried rice, fried egg or fried noodle with those filling. )


Steps of Cooking Fried Bāozǐ

(1) Add oil into the fried pan. Make sure oil is covered around the pan. Put bāozǐ into the pan and switch to medium heat.
(2) Pour water into the fried pan. The amount of water should be over 1/2 of bāozǐ’s height. Cover the lid. Switch to high heat to bring the water to a boil at 2 minutes. And then, switch back to medium heat and keep boiling around 10 ~15 minutes

(3) Uncover the lid. If there is still some water in the fried pan, let water keeps boiling.
(4) When water is almost gone, turning to small heat. Turn off the heat turn light brown.
(Selena’s Kitchen Talk: Move forward and back of fried pan, and then you can easily get the fried bāozǐ out. If using a spatula to get the fried bāozǐ at the beginning, it will be easily fallen apart.)

 
I know it is difficult for people at the beginning. But, I remember how difficult it is when I cooked or baked at the first time. Just practice more, then you get used to it. If it is too much to eat once, using putting it in a freezer bag. You can save it around 3 months.


It is very YUM, especially eating immediately. But, be careful!! Don’t burn your lip and mouth. Enjoy it!


Saturday, 29 August 2015

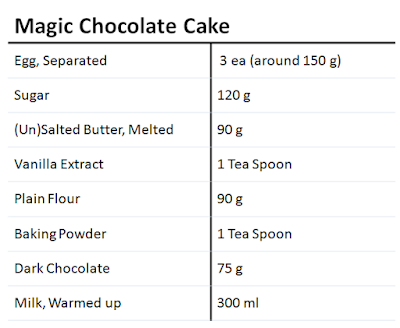
Magic Chocolate Cake


My lovely flat-mate and friend is totally chocolate obsession. ME, TOO. In order to celebrate we finished one-year studying in the UK. We would like to bake a chocolate cake. Brownie? No. We baked it too many times. After doing some studyings, I find out “Magic Chocolate Cake.” Why is it called “magic”? This kind of cake doesn’t need to do topping, filling, or base separately, and then it has three layers. Having three layers means you can have three different tastes in ONE bite. But, it is needed to mix the batter with a specific order. Like Mary Berry said, Read the recipe carefully, at least twice. Then, we can enjoy it.


Oven Temperature Setting: 160/325, Baking Time: Around 40~50 minutes
Recipe: Serve for a 8” baking tin
(Selena’s Kitchen Talk: Actually, I don’t find out the difference taste when using salted or unsalted butter. If you have some worries, you can use unsalted butter.)


Steps
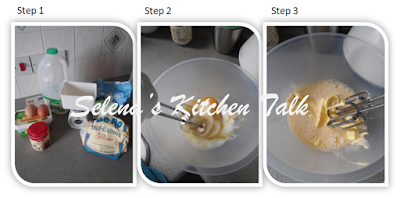
(1) Weight all the ingredients
(2) Separate the eggs. Put the egg white and the egg yolks into the different bowls.
(Selena’s Kitchen Talk: The bowl for the egg white needs to be CLEAN and DRY.)
(3) Add Sugar into the egg yolks. Whisk it until it is well-mixed.

(4) Add melted butter and vanilla extract into the batter. And mix it well.
(5) Add flour into the batter and mix it
(6) Add warmed milk and melted chocolate into the batter gradually. And continue to beat it.
(Selena’s Kitchen Talk: I melted chocolate in the measure jar. When it is almost melted, I pour the milk in. So, I don’t need to warm up again.)

(7) Beat the egg white until it is stiff.
(8) Fold the egg white into the chocolate batter, 1/3 per time. Repeat it until we use all the egg white. Make sure egg white is well-mixed into the chocolate batter.
(Selena’s Kitchen Talk: Because of the different density of egg white and chocolate batter, folding 1/3 per time can make it easier to fold.)
(9) Pour the batter into a 8” tin with baking paper. Send it into the pre-heated oven at 160/325. Bake it around 40~50 minutes.
(Selena’s Kitchen Talk: Insert the cake tester into the middle of the cake. If there is no batter left on it, it means it is ready.)

 
When it is well-cooked, I’ll leave it into the oven with an open door around 10 minutes. (Of course, the oven is switched off!) It can prevent the sink because the temperature difference.

During the baking, the smell of chocolate is too good. I know…I know I can’t wait to eat it. You can eat it in hot or cold. You will have different kinds of feelings. For chocolate cake, I like to eat it with coffee. So, try it and enjoy it. You will LOVE it.

Friday, 28 August 2015

Russian Bun


In Taiwan, the Russian Buns is a hot product in bakeries. Because this kind of buns uses lots of butter to enrich the flavor, people love them. Look at the name, you may wonder if it originated from Russian. Although some people say yes. I tried to look some Russian websites and ask my Russian friends. They have no idea what it is. ANYWAY. No matter who invented this kind of bun, I need to say thank you.


Oven Setting Temperature: 180 degree C, Baking Time: around 20 minutes
Recipe: Serve for 4 ea


Steps

(1) Weight all the ingredients
(2) Put strong and plain flour, sugar, salt, and instant yeast into the bowl. And mix it well.
(Selena’s Kitchen Talk: Different instant yeast manufacturers have different instructions. Please check it.)
(Selena’s Kitchen Talk: If you need to add yeast before adding any liquid, I always mix flour, sugar salt well. And then, mix yeast again.)
(3) Add the egg and 80 ml milk into the bowl. Mix the dough into a ball


(4) Mix 40g butter on the dough and knead it into the dough
(5) Add the rest of milk into the dough several times when kneading it.
(Selena’s Kitchen Talk: This can make your dough absorb liquid very well. And make it softer.)
(6) Knead the dough into a ball when it is ready. Brush water on the surface. And leave it in a warmer place around 60 ~ 90 minutes to grow up.


(7) Divide it in half and then wait for another 15 minutes.
(8) Roll the dough into a long and narrow strip, around 50 cm by 10 cm.
(9) Have a diagonal cut.


(10) Roll the dough towards the pointed end.
(11) Cut the dough, but not cut through it. Almost to the middle of the dough. Wait for the second grow-up. Around 40 minutes.


(12) Brush egg on the dough. Heat it at a pre-heated oven at 180 degree C around 10 minutes
(13) Take it out from the oven. Brush melted butter. Bake another 10 minutes
(Selena’s Kitchen Talk: You need to use out all of it.)


I know it is a little complicated, but it is definitely worth of it. This is my first time to do this. My cutting was not so good. But, it doesn’t affect the flavor. So, challenge the perfect shape again. May, I can do a cheese flavor. Enjoy it.

Thursday, 27 August 2015

Blackberry Cake


It is blackberry season now in the UK. You can pick up lots of blackberries walking in the countryside. Picking up blackberry is like a mother-daughter activity every summer. They will go and pick up every weekend and leave some in the freezer. I also saw an older couple that the husband picked up one and fed his wife. It was so touching me.

But, I got too many to eat. Why not just do some blackberry cake? Then, go picking up again.


Oven Setting and Time: 160 degree C, around 30~40 minutes
This recipe is for one 8” tin


Steps of Blackberry Filling

(1) Put blackberry and sugar into the fired pan. Boil it at medium heat around 5 minutes.
(Selena’s Kitchen Talk: We can use a folk mashing a couple of blackberries first. It is easier to cook it. )
(2) Pour it out through a sieve. We only need cooked blackberries. Set aside.


Steps of Cake

(1) Weight all ingredients
(2) Well-mixed milk and egg


(3) Add butter into the mixture. Whisk it again.
(4) Add flour, sugar and baking powder into the mixture 2 or 3 times. And mix it well.


 Assembly

(1) Add blackberry filling into cake batter and mix it gently several time.
(2) Pour the mixture into a 8” tin with either baking paper or greased surface. Send it into a pre-heat oven at 160 .


When it is well-cooked, I’ll leave it into the oven with an open door around 10 minutes. (Of course, the oven is switched off!) It can prevent the sink because the temperature difference. And then, move the YUM cake on the cooling rack.

Because we mix blackberry into the cake, you can enjoy blackberry at EVERY BITE. I bring it to the picnic. Everyone LOVEs it and asks me to share this recipe. You can eat it individually. Or, you can try to eat it with a spoon of vanilla ice cream. Try it and let people know which way you prefer. ENJOY IT!

Wednesday, 26 August 2015

Pineapple Bun


In Taiwan, or I can say in most Asian cities, we prefer softer buns or bread. Of course, I like crispy breads, like baguette. Sometime, I still miss those soft buns.


Having a life in a foreign country means you can’t eat your hometown food easily. Even, it might be sold in a foreign country, the taste will be changed to fit local people’s taste. Pineapple bun is very popular in Taiwan, Hong Kong and Japan that it is sold in every bakery. There is no huge different on baking, but the way people eat it will vary. Most people eat is directly as a breakfast in Taiwan, while people eat it with a layer of butter in between in Hong Kong.


So, let’s just do it today. Ingredient is reference Carol 自在生活 : 湯種菠蘿麵包


Oven Setting and Time: 170 degreeC, around 20 ~ 22 minutes
 
Ingredients - For 8 buns 
 
Steps for Buns
 
(1) Put yeast into 50ml milk. And then, put milk into a hot water bowl to warm it up. It takes around 5 minutes
(Selena's Kitchen Talk: Check your manufacturer and check their instruction.)
(2) Weight all ingredients well before starting our brilliant work
(3) Put Strong Flour, Plain Flour, Granulated Sugar and Salt into a big bowl. And then, stir a while. (Selena’s Kitchen Talk: Every time I bake the bread, I will mix dry ingredients firstly. Salt will kill yeast if it touches to yeast directly )


(4) Then, add Hot Batter, Large Egg and item (1) into the bowl as well. Stir and mix into well until there is no flour.
(5) Now, having the rest 30ml milk into the jar. (Selena’s Sharing: If there is any yeast leaving on the surface of jar, you can get a small piece of dough to stick the rest yeast.)
(6) Move the dough ball into a lightly floured work space. And put butter on the dough. Then, start to knead it.  
 
(7) Add 30ml milk several times when you knead the dough into a smooth and elastic dough ball. (Selena’s Sharing: Adding milk into dough several times can make sure that the dough totally absorb the milk. I tried to add once at the beginning when I started to bake. It was okay, but the dough ball was very dried. )
(8) When the dough ball has a smooth surface, moving it back to the lightly greased bowl. And brush some watch or milk on the surface of the dough ball. Wait around 1~2 hours until it doubles the size. Either you cover the bowl with wet towel or you can put into a cold oven or microwave. 


Then, we well-utilize the time to prepare the topping when waiting dough doubling the size.

Steps for Toppings

(1) Weight all ingredients firstly.
(2) Put Unsalted Butter and Granulated Sugar into a bowl. And then, whip butter and sugar until it looks like pale and fluffy.
 
(3) Add whipped egg into the bowl. And then, whip with the butter and sugar mixture until it is well-mixed.
(4) Add Plain Flour into the batter twice or third time and mix it. 
(5) Make sure there is no flour left. And then, cover it and wait it at refrigerator.


Steps of Assembling Topping and Buns

(1) Separate topping dough into 8 small balls
(2) Put one on a lightly floured work space. Press into a flatter circle and roll it into a 2 ~ 3mm. Repeat 8 times
(3) Separate bun dough into 8 balls as well


(4) Cover the topping sheet with bun dough
(5) Put it on a greased flat tin
(6) Slash the top as a grid


(7) Wait another 40 ~ 60 minutes until it doubles the size.
(8) Brush some whipped egg on the top before sending it into oven


LALA~ Wait around 20 ~ 22 minutes. It is ready when the surface becomes brown. Then, we are ready to ENJOY it.


Hot Batter


It is a batter to make your buns and breads softer without adding any emulsifiers. It is a very popular baking method in Asia. Some people say that it originated from ancient China, while some people say it is created by Japanese. No matter what the truth is. It is a natural way for bakers.

Flour will be gelatinized after heating up for a while. So, adding “Hot batter” into the dough can make the dough absorb more liquid. Then, it is highly elastic and allows it to stretch. But, this kind of dough will be sticky. It will be a little difficult to knead at the first few times. Practice it more times, then you will get used to it.


Ingredients (Reference Carol湯種基本麵包麵團 http://caroleasylife.blogspot.com/2009/02/blog-post_28.html ) 
 
Steps

(1) Weight all ingredients
(2) Pour flour into a fired pan. And then, pour milk and water into the fired pan. Well-mixed firstly.

(3) Switch the ring on. Simmer with the medium heat. Stir it all the time.
(4) When it starts to gelatinize, switch the ring off immediately. BUT, keep stirring for another 1~2 minutes. 

Selena’s Kitchen Talk: I always prepare 2~3 portions and save them into freezer. Just move it to fridge a day before cooking. Leave it at the room temperature 30 minutes before mixing into dough.